Updated 21Feb11
CISCO VPN and Drive Mapping instructions
Cisco VPN:
Note - items in RED pertain to Windows 7, all others to Windows XP
There are 3 files that you will need to complete this
installation.
The entire process should take less than 15 minutes.
Please disconnect from the VPN and close all programs before proceeding.
Please note that these instructions are compatible with
Internet Explorer, NOT Firefox, Chrome, or other browsers.
Please print out these instructions.
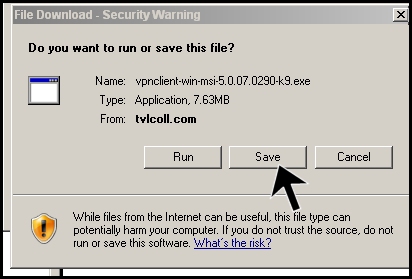
1) Download the first file by single-clicking on this link:
vpnclient-win-msi-5.0.07.0290-k9.exe and when asked,
select Save:
If asked, please re-enter hiq/arrow on the sign-in screen.
(For 64bit users, click here).
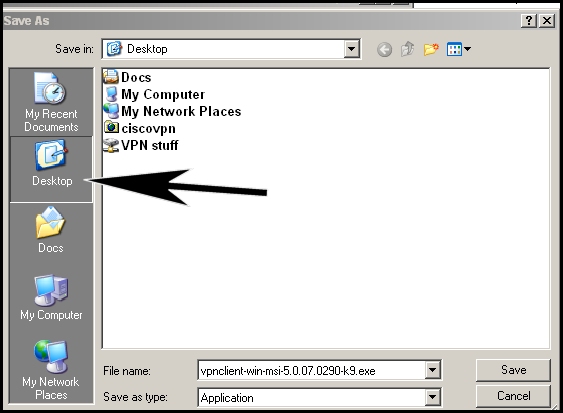
Windows will now ask you where you want to save it. Select Desktop on the left, then click Save on the bottom right. Leave the "File Name" and "Save as Type" alone.
2) Minimize all
programs so you can see your desktop.
Find the file
that you just downloaded (vpnclient-win-msi 5.0.07.0290-k.9.exe) on your
desktop, and double-click on it.
If you get a warning about an Unknown Publisher, say RUN.
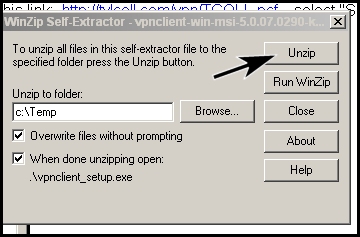
You'll next get a box asking about Unzipping. Leave the defaults alone, and
click on Unzip:
Click OK after the unzipping is complete. You may see another warning about
running a program from an unknown publisher;
say YES if you do.The Cisco Installation Wizard will
start the install process.
Click on NEXT.
Click on Agree With License on the "I
Agree with License" screen.
Continue to click NEXT on each screen, without changing any values.
When the Install is complete, click FINISH, and it may prompt you to re-boot
your machine. If you're not prompted, please reboot now.
3) Taking the second
and third files:
Open Internet Explorer and return to this page:
http://www.arcopress.net/tvlcoll/vpn
Username: hiq
Password: arrow
Second file: Right-mouse click on this link: TCOLL.pcf ,
select "Save Target As" (or Save Link As"),
(you may be prompted again for the username/password: hiq and arrow),
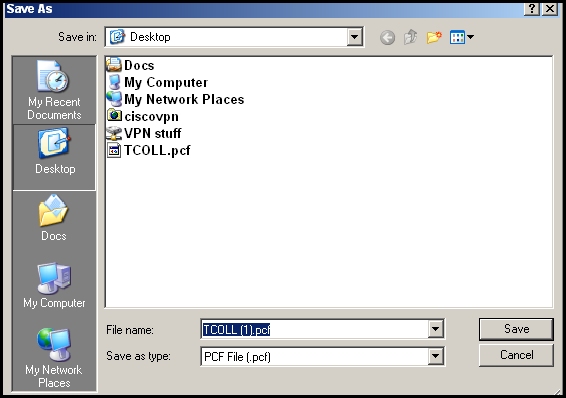
and save it to your desktop, selecting Desktop on the left, and leaving the "
File Name" and "Save as type" alone.
(Some versions of Internet Explorer change the 'Save as type" to "Text" . If this happens, please pull down the "Save as Type' Box and select 'All Files' .)
Click Save on the
bottom right box.
When the download is complete, close the window.
3Rd File: (this is a alternative backup for the 2nd file in case of a failure)
Right-mouse click on this link:
TCOLL-backup.pcf
Please follow the same procedure as above in 3) to save to your desktop.
4) Open Windows Explorer :
Start/Programs (or All Programs) /Accessories/Windows Explorer.
NOTE: THIS IS WINDOWS EXPLORER, NOT INTERNET EXPLORER
Navigate to
Desktop (single-click) on the left side:
WIN7: My
computer/Local Disk C/Users/{your user name}/Desktop
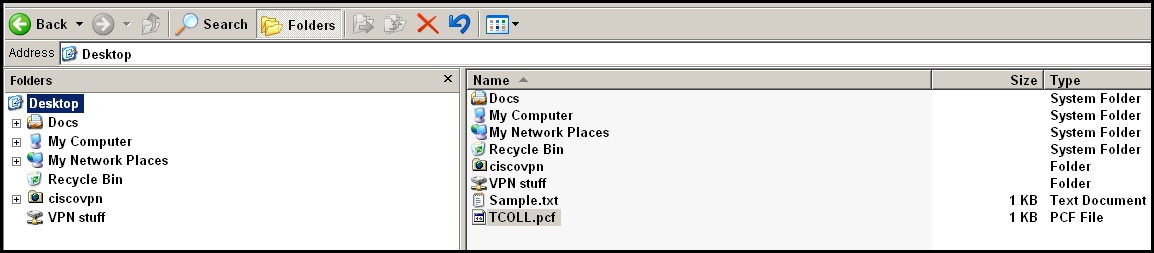
Single click on TCOLL.pcf on the right; It will be highlighted. Right-click and select Copy.
While still in Windows Explorer:
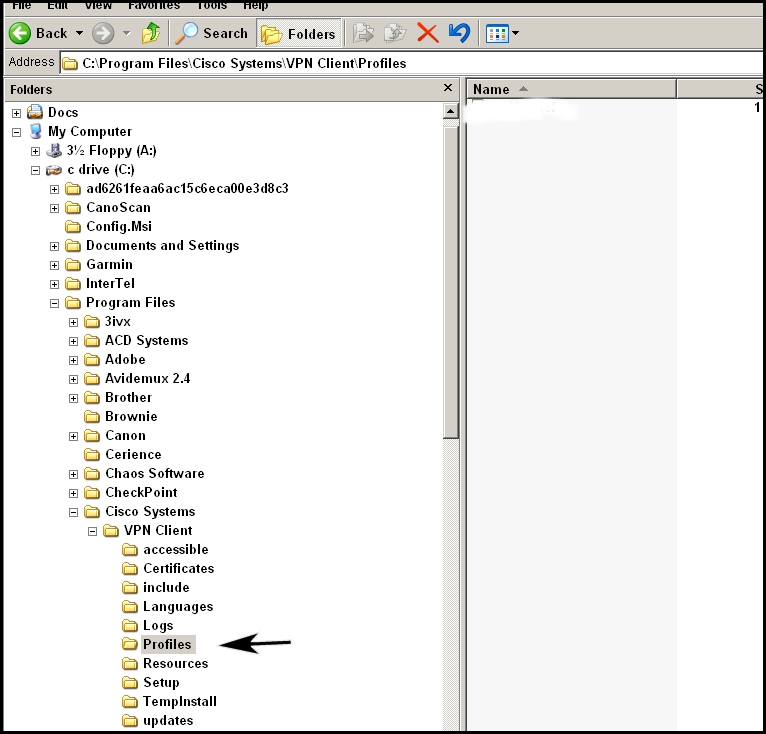
Navigate to My Computer, click on the +
sign.
Navigate to the C Drive, click on the + sign.
Navigate to Program Files, click on the + sign, (Program
Files (X86)
Navigate to the Cisco Systems Directory, click on the + sign
Navigate to the VPN Client, click on the + sign
Single-click on the Profiles folder on the left. It will now be highlighted.
Right-click and select Paste. This will add the TCOLL.pcf file to the Profiles
folder:
Close Windows Explorer, close "Profiles".
5) Launch the Cisco VPN client program
by going to Start/Programs (or All Programs)/Cisco Systems VPN Client, and click
on VPN Client.
When the program opens,
double- click on the TCOLL entry, and enter your domain username and password
(example: username=betty, password=xxxxxxxx).
If you don't know your username, please contact Kathryn.
When you open your email (Outlook), you be be asked to
re-authenticate. If the usual username is not accepted, try entering tvlcoll\username
in the username box.
You should now be successfully connected to the VPN. You will see an icon down
next to the clock indicating that you are connected.
6) Add the 2nd PCF back-up file to the Cisco:
Find your Cisco VPN client and double click to open it. In this example below, it says Disconnected, yours will say Connected.
If your VPN client is missing some of these buttons, go to Options and click on the “Advanced Mode”
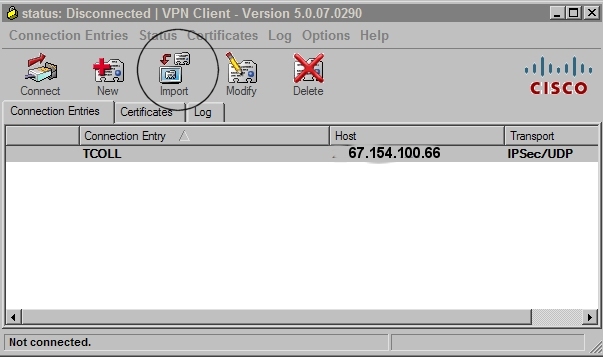
Now, Click Import. See screenshot above. You will be asked to browse (“Look in”) to the location where you saved TCOLL-backup.pcf. Browse to your desktop and highlight the file TCOLL-backup.pcf and click Open.
The import takes just a brief moment.
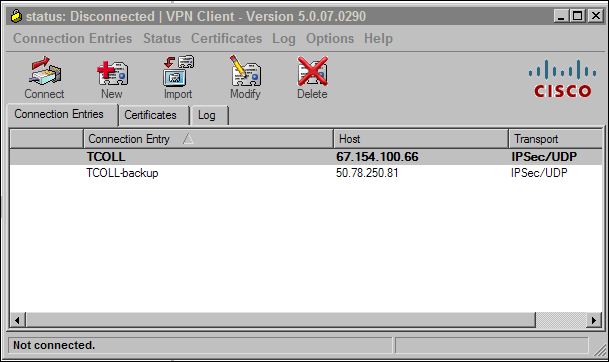
Now you should see the TCOLL-backup as seen below. And, you’re done. You can go back to Simple Mode by selecting it in Options.
7) To create a shortcut on your
desktop for future use, go to Start / Programs (or All Programs) / Cisco Systems VPN Client, then RIGHT-CLICK on VPN Client, and select Send To,
then click on the "Desktop Create Shortcut" item
(left-mouse click).
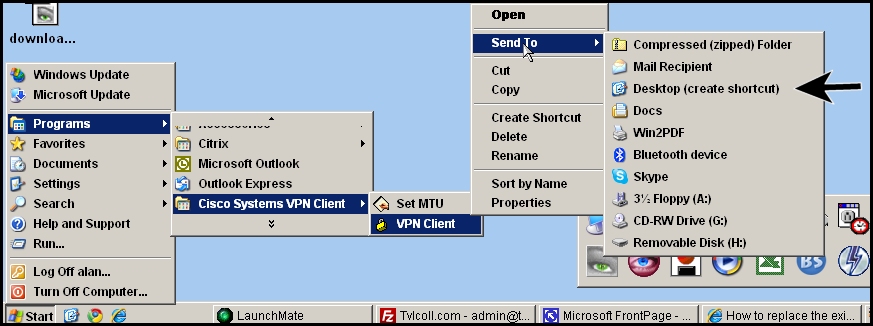
You can also delete the three files from the Destop that were placed there for the installation: (vpnclient-win-msi 5.0.07.0290-k.9.exe, TCOLL.pcf, and TCOLL-backup.pcf ) by right-clicking on each and deleting.
DRIVE F OR DRIVE Z Information
Either Drive letter can be 'mapped' to access your
files in the office. If you've already got an old mapped drive, then take the
corresponding file (goodZ.txt or goodF.txt).
goodZ.txt
Right-click either file above and choose “Save As” (or Save Target As).
If asked, please re-enter hiq/arrow on the sign-in screen.
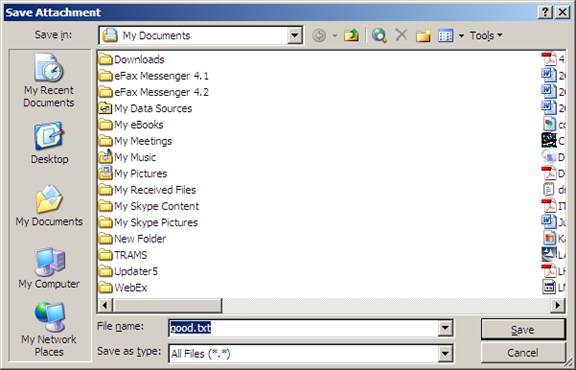
Click “Desktop” on the left so that the Save In location changes to Desktop.
Change the file name to New Drive Z.bat, or New Drive F.bat
Click Save.
Go to your desk top and find the file called New Drive Z.bat or New Drive F.bat and double click.
You should be prompted for your user name and password.
(This is your windows user name and windows password.)
Once you have confirmed that New Drive.bat gives you access to files on our network, go back and delete the old “Get Drive ” shortcut if you. To do this, you would right click on the icon, then choose delete.
So, now, each day after you’ve connected to our Cisco VPN, you’ll double click the
icon called “New Drive Z” , or "New Drive F" if that’s your normal daily procedure. (If you don’t access files on our network every day, you may not be doing this daily.)